Home

Wednesday, November 8, 2023

SpringBoot: Adding custom properties to ApplicationContext dynamically


While building a Spring Boot app, we often get into a situation where we need to dynamically add the properties to the ApplicationContext during application startup. Spring Boot provides an intuitive interface named ApplicationContactInitializer that can be implemented to programatically initialize the ApplicationContext or to add additional property sources to the ApplicationContext.

Below is a sample implementation of this interface to add a application run id to the application context.

    public class CustomApplicationContextInitializer implements ApplicationContextInitializer {
        private static final Logger log = LoggerFactory.getLogger(CustomApplicationContextInitializer.class);

        @Override
        public void initialize(ConfigurableApplicationContext applicationContext) {
            final ConfigurableEnvironment environment = applicationContext.getEnvironment();
            final MutablePropertySources propertySources = environment.getPropertySources();
            var dynamicProperties = new HashMap();
            dynamicProperties.put("run-id", UUID.randomUUID().toString());
            propertySources.addLast(new MapPropertySource("dynamic-properties", dynamicProperties));
        }
    }


Thereafter, we can register the CustomApplicationContextInitializer to the SpringBootApplication before calling it's run method as below:

    @SpringBootApplication
    public class Application implements CommandLineRunner{
        public static void main(String[] args){
            SpringApplication application = new SpringApplication(Application.class);
            application.addInitializers(new CustomApplicationContextInitializer());
            application.run(args);
        }
    }

Now, the run-id added during the ApplicationContext initialization will be available as part of the ApplicationContext.

Saturday, July 18, 2009

Cleaning the Registry

Whenever we talk about registry, REGEDIT.exe is the first thing that comes in our mind. But after entering this database and seeing the type of entries we are deterred to start the cleaning process. So here I will be telling how to go about the cleaning process.

There are basically two methods for cleaning the registry. One is manually cleaning the registry using regedit and second is using a Registry cleaner software. As you install and remove software many software leave their impression on the registry and the registry keeps on growing bigger. As a result your system slows down and you may get unnecessary errors. To get rid of this frustration you got to clean your registry.

Manually cleaning the Registry

Registry is a database that holds the configuration of your computer. It allows you to perform many tweaks your operating system does not allow directly. I have discussed many of them in the earlier posts. A Registry can be edited using a registry editor. Windows has been shipped with a default registry editor named “Regedit”. To open regedit go to Start>Run , then type regedit. You’ll reach a window as shown :


Before you touch any part of the registry remember to backup your registry. For that you can either use System Restore or simply select the key you are about to modify in regedit and click File>export. This will create a backup registry file and double clicking this file will restore the value of the key you were trying to manipulate.

Registry editors depict a logical hierarchy of configurations. Registry is divided into six main parts called hives. Each hive has keys and sub keys that have some value assigned to it. These values can be either a DWORD, string or Binary. DWORD stands for double word, string stores values that are of string type and Binary stores the values in terms of 0’s and 1’s.

The six hives store different configuration as follows :

  • HKEY_CLASSES_ROOT contains information relating to the user interface, file association mappings and OLE(Object linking and embedding) information.
  • HKEY_CURRENT_USER contains information related to the current user of the system.
  • HKEY_LOCAL_MACHINE contains information that is common to all the users of the system
  • HKEY_USERS contains information about individual users, each of which is identified by a Security ID.
  • HKEY_CURRENT_CONFIG contains all the information that is collected when the computer boots up. This information is not stored in secondary storage but is generated every time the computer boots up.
  • HKEY_DYN_DATA contains information related to the plug and play devices. The DYN indicates that this information is dynamic which changes as new device is attached.

So with the above basic information you can go on with editing your registry to solve the specific problems you might be facing. But remember to backup the registry.

Using Registry Cleaner Software

If you do not want to take any risk with your Operating System, you can go safe by using a Registry Cleaner Software. These software scan your registry to search for missing references to files etc. They safely bring your system back to the normal working condition. You can clean your registry here. This method is best suited for a novice who is not willing to spend few of his precious hours reinstalling the Operating System.

Some of the famous Registry Cleaners available online are :

Thursday, October 4, 2007

WiMax Technology

WiMax (Wireless Interoperability for microwave access) is a wireless digital communication system based on IEEE 802.16 standards. It can be used for transmitting data from a fixed station as well as a mobile station. It can provide wireless access upto 50 km for fixed stations and 15 km for the mobile ones.
Among the main uses of WiMax comes the internet connectivity for laptops. In a radius of upto 10 km WiMax can give access rates of upto 40Mbps per channel. In India(a south asian fast developing economy), WiMax network is being setup in Chennai, a city in south of India. This technology if spreads out to the entire country can benefit the 1 billion citizens of India, especially the villages of India where still for many using internet remains a dream.

Associated Links :

Monday, October 1, 2007

CDMA or GSM

In the present day scenario the GSM (Global System for mobile communication) is dominating in most parts of the world, but rapidly the CDMA (Code Division Multiple Access) is taking over it because of the additional advantages it provides.
In CDMA there is no division of frequency band unlike GSM which assigns a specific frequency to each user. Each user in GSM is identified using the SIM(Subscriber Identity module) card which stores the service subscriber key used to identify the user.

On the left is shown a CDMA phone by Tata Indicom.
CDMA employs spread spectrum technology in which the energy generated in a particular bandwidth is spread in the frequency band. This frequency band is used for all the users. It provides better bandwidth for the voice and data transmission over the network and hence increases the number of people that can be connected at any given time. This means using it you will hear less of those irritating("Network is currently busy") messages. Surely CDMA provides high speed services.
But inspite of all these benefits of CDMA we cannot forget the advantage given to SIM card owners to easily change their mobile phones.

Friday, September 28, 2007

Removing the hand icon displayed below shared drives

Whenever we share any of our harddisk drives a hand icon appears below that drive. Surely, a nice way to show that it is shared, but when all your drives are shared, the same hand starts annoying us. In order to get rid of this hand we have to perform a registry tweak.
Open regedit ( Go to start>Run and type in regedit) .
  • Browse to the location HKEY_CLASSES_ROOT>Network>Sharing Handler.
  • Open the default icon by double clicking it.
  • In the value data textbox the default value is ntshrui.dll.
  • Erase this value to leave the space blank.
  • Restart your PC and see the change in the icon of your shared drives.

Thursday, September 20, 2007

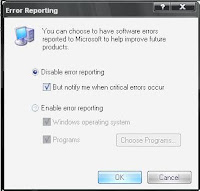
Disabling Windows Error Reporting

It's pretty much frustrating when windows prompts you to report the errors to the microsoft website. You can stop this reporting if you like by following some simple steps.
  • Open the control panel
  • Double click on the System icon
  • Click on the Advanced tab
  • Click on the button named "Error Reporting"
  • Now on the window that appears click disable error reporting as shown.

Well now you can fell free of those irritating error reporting messages and enjoy your work on the PC.

Sunday, September 16, 2007

Renaming the Recycle Bin

When it comes to playing with your system settings, there is no better place than regedit to get your hands dirty on. Regedit the short for registry editor allows us to make changes in the windows settings pretty easily. Changes like changing the boot up screen, wallpapers, security related issues can easily be tackled with through the registry.
When you right click on the recycle bin unlike other icons, the rename option is not displayed in the pop-up menu. But this doesn't mean it can;t be changed. Well now it's time to open up regedit. For that go to the Start>run. Then type regedit. You will be presented with a screen as shown below :


Now go to the location "HKEY_CLASSES_ROOT/CLSID/{645FF040-5081-101B-9F08-00AA002F954E/ShellFolder/}" by expanding the '+' signs.
Once you reach there double click the "Attributes" icon.
Then change the value data from "40 01 00 20" to "50 01 00 20".
Now double click "CallForAttributes" icon and change the value data to 0.

Rejoice! Now you can jump back to your desktop and right click the recycle bin to see the rename option. Click it and name the recycle bin to whatever you want.

Some tweaks you can perform (Always remember to create a backup of your registry before performing any of the registry tweaks) :

Wednesday, September 12, 2007

Auto shut down of the computer for firefox download

After working for hours to find the correct matter to download, surely one does get exhausted and does need some rest. But after all this if you have to wait for the download to finish, frustration is an obvious outcome.
For all you guys who work on firefox most of the time, there is a Add-on provided by firefox which allows you to turn off your computer once the list of download items finishes. It adds an icon to the status bar and the download manager, which enables you to automatically shut your computer down once the download has finished. To download this add-on click here.

Sunday, September 9, 2007

Creating a Bootable Pen Drive

All of us must have encountered the situation where our very own PC refuses to boot whatever the problem may be. It is here that a USB drive containing bootable XP comes in handy. You can install a bootable XP on to the pen drive along with the safety tools such as antivirus etc. to fix the problem.
But this cool way might not shine the light equally on everyone. In order to boot from a flash drive your system should be only around two years old. An alternative to this is that you upgrade your BIOS. Also the flash drive you use should be of a minimum of 256 Mb size to hold windows XP. Also a maximum size of 2GB is permissible.
So now you have the pendrive and an approprite BIOS. So get started with creating a bootable pen drive. For that you need to have a USB Disk storage format tool which is available for free. Now you can start formatting your pen drive. Then to make it bootable copy the following files on to the pen drive : Boot.ini, NTLDR, and NTDETECT from root directory of the boot drive.
Now you will be needing a software named BartPE that helps you install windows on a minimal space. After you have downloaded it follow the steps to copy the Windows files.
After you are done with all this you are having your very own flash drive ready to boot your Windows XP2.

Associated links :

Thursday, September 6, 2007

NTFS (New Technology File System)

Whenever you are formatting your harddisk, the option for either a NTFS or a FAT file system pops up. Fine you know NTFS is new and better but how.
A file system is a part of the operating system that determines how files are named, stored and organized on a volume. FAT (File allocation table ) was the standard file system developed by microsoft for the MS-DOS. This was used in all the windows till the Windows ME. Then came the NTFS (New Technology File System) which almost replaced the FAT file allocation.
The NTFS allows greater reliability, security, greater volume size etc. In NTFS all the characteristics of the file (like filename, date of creation) are stored as metadata. NTFS utilizes the power of B+ trees to index file system data. The master file table is used to store the metadata about every file present on the volume. In this system greater security is provided as we can restrict access of files to authorized users.
These features of NTFS sure does give them a reason to be chosen while opting for the type of file system for formatting.

Associated topics :